The first thing was finding some good reference for the model. I really like the look of the Terminator after he gets his face smashed and you see the metal parts area of the eye. Heres a couple of the reference pictures-- one for the face and the other for the body.
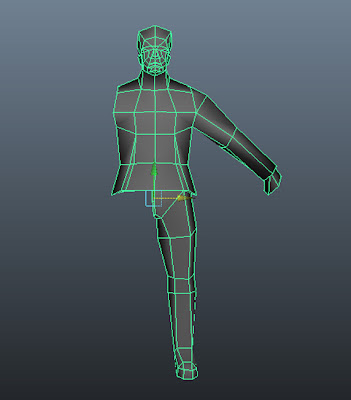
The next step is to build your mesh. This requires planing because of the low tris limit. The most important thing is to look at your models silhouette from the front and side. Depending on what you consider to be your characters defining features; will depend on where you want your use your tris. Although most character will be built very similar in this resolution-- I wanted to use a few extra tris on the face to make sure that I got that tough guy look with the chin and lower lip; along with the bodybuilder frame.
After getting the character at point where I was happy, I started to plan out my UVlayout. Only having 256 x 256 space to work with, I needed to use the UV space effectively. Having an asymmetrical face and middle section and mirroring the arms and legs is a great way to keep a real look to your character. A lot of times you will see textured perfectly mirrored and it looks weird whenever the symmetry is visible.
Next, you need to UV your model (I use Headus UVlayout). so I only brought in half the model into Headus, UVed it and then re- import it into Maya. In Maya, I mirrored the mesh and combined the model and reload it back in Headus. In Headus you want to load it with UVs, so you keep your previous UV map-- un-drop the head and mid-section and re-cut them; then flatten in UV space.
Green lines in Headus show seams.
Seams show after re-cut in Headus.
The UVlayout from Headus.
The UVs rearranged in Maya. The arm and leg share the same UV space. The head is blown up 2x to allow more resolution in that area.
Here's where you can go with a low poly or high poly route. If you want you can generate your diffuse map from image mapping or go the long way and do a high poly model and extract maps from that. Because the low poly image mapping process is pretty straight forward-- basically you use images in Photoshop and line them up-- I'll skip that pipeline.
The high poly process is a little more complicated and probably a little overkill for something like this. However in a lot of games you will use a higher resolution in a cinematic, even if the game model texture is lower. Frankly I prefer the high poly pipeline due to the flexibility it gives you and the overall control I have with my final texture.
In Mudbox, I sculpted the model from the low poly. You can see from the model I really only sculpted the parts that I needed. So the left side is largely un-sculpted.
After finishing the sculpt, you want to get a low poly model from maya that has the mirror geometry deleted. If you leave the mirrored geo. the maps generated will be on top of each other wherever UV space is shared.
The maps that I generated from xNormal was a normal, ambient occlusion, and convexity. These maps were all 512 x 512.
Specular (used CrazyBump), ambient occlusion, convexity, and normal maps.
From the extraction, you'll need to take a few minutes cleaning up your maps in Photoshop. Most of the clean up is done around the inner leg area and armpits.
Now its time to paint the model in Mudbox. and extract the diffuse map.
Most of the work from here on is in Photoshop with the textures-- tweaking them to add contrast and flatting them into one diffuse map.
Diffuse/ Color only
Diffuse with AO and convexity maps
The next part is taking your normal map from xNormal and bring it into CrazyBump and generating a specular map. By placing the specular map on top of the diffuse as a 'soft light' or 'overlay' you can get some nice highlights.
Diffuse multiplied with AO and convexity maps with specular overlay
The second to last step is to de-res your texture it to 256 x 256 and change its mode from RGB to 256 colors. You'll notice after changing your image to 256 colors you can only save it a certain file types; targas and pngs work fine. Finally, applying the texture to your Maya model. If you have been working with a texture in a higher resolution you might get a few seams in your texture. To fix this, use the 3D paint tool in Maya to touch up the seams. And here's the final model. enjoy.


